
Page 400 - Window and Door Hardware Catalog
P. 400
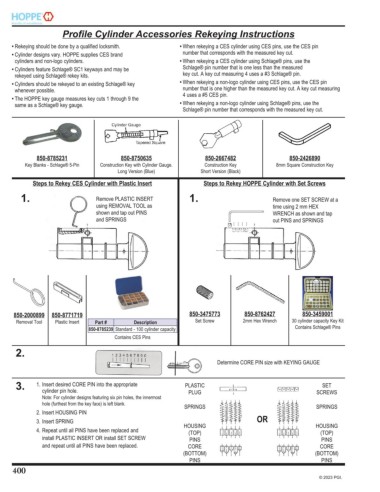
Profile Cylinder Accessories Rekeying Instructions

       ! Rekeying should be done by a qualified locksmith.    ! When rekeying a CES cylinder using CES pins, use the CES pin
       ! Cylinder designs vary. HOPPE supplies CES brand      number that corresponds with the measured key cut.
       cylinders and non-logo cylinders.                    ! When rekeying a CES cylinder using Schlage® pins, use the
       ! Cylinders feature Schlage® SC1 keyways and may be      Schlage® pin number that is one less than the measured
       rekeyed using Schlage® rekey kits.                  key cut. A key cut measuring 4 uses a #3 Schlage® pin.
       ! Cylinders should be rekeyed to an existing Schlage® key      ! When rekeying a non-logo cylinder using CES pins, use the CES pin
       whenever possible.                                  number that is one higher than the measured key cut. A key cut measuring
       ! The HOPPE key gauge measures key cuts 1 through 9 the      4 uses a #5 CES pin.
       same as a Schlage® key gauge.                        ! When rekeying a non-logo cylinder using Schlage® pins, use the
                                                           Schlage® pin number that corresponds with the measured key cut.


            850-8785231                850-8750635               850-2667482                850-2426890
         Key Blanks - Schlage® 5-Pin  Construction Key with Cylinder Gauge.   Construction Key   8mm Square Construction Key
                                      Long Version (Blue)       Short Version (Black)
           Steps to Rekey CES Cylinder with Plastic Insert       Steps to Rekey HOPPE Cylinder with Set Screws
       1.                      Remove PLASTIC INSERT        1.                        Remove one SET SCREW at a

                               using REMOVAL TOOL as                                  time using 2 mm HEX
                               shown and tap out PINS                                 WRENCH as shown and tap
                               and SPRINGS                                            out PINS and SPRINGS


     850-2000899  850-8771719                               850-3475773      850-8762427        850-3459001
      Removal Tool  Plastic Insert  Part #  Description       Set Screw      2mm Hex Wrench  30 cylinder capacity Key Kit
                             850-8785239 Standard - 100 cylinder capacity                    Contains Schlage® Pins
                                     Contains CES Pins

      2.
                                                                     Determine CORE PIN size with KEYING GAUGE


      3.    1. Insert desired CORE PIN into the appropriate    PLASTIC                                SET
              cylinder pin hole.
              Note: For cylinder designs featuring six pin holes, the innermost   PLUG              SCREWS
              hole (furthest from the key face) is left blank.  SPRINGS                             SPRINGS
            2. Insert HOUSING PIN
            3. Insert SPRING                               HOUSING               OR                 HOUSING
            4. Repeat until all PINS have been replaced and    (TOP)                                 (TOP)
              install PLASTIC INSERT OR install SET SCREW    PINS                                     PINS
              and repeat until all PINS have been replaced.   CORE                                   CORE
                                                          (BOTTOM)                                  (BOTTOM)
                                                            PINS                                      PINS
     400
                                                                                                     © 2023 PGI.